

A less comprehensive version of this guide is available on Youtube. You can also watch it anonymously over Lokinet at Invidious.loki
This guide has been done on Pop!_OS 22.04 LTS, but it should work for any Ubuntu based system, and most likely Debian.
- Add Oxen Debian repository to apt and update it:
sudo curl -so /etc/apt/trusted.gpg.d/oxen.gpg https://deb.oxen.io/pub.gpgecho "deb https://deb.oxen.io $(lsb_release -sc) main" | sudo tee /etc/apt/sources.list.d/oxen.list
NOTE: Linux Mint uses a different release naming scheme that doesn’t work with the command above. Instead, choose one of the commands below depending on which Linux Mint version you use
Linux Mint 19, 19.1, 19.2 or 19.3:echo "deb https://deb.oxen.io bionic main" | sudo tee /etc/apt/sources.list.d/oxen.list
Linux Mint 20, 20.1, 20.2, 20.3:echo "deb https://deb.oxen.io focal main" | sudo tee /etc/apt/sources.list.d/oxen.list
Linux Mint 21, 21.1 or 21.2:echo "deb https://deb.oxen.io jammy main" | sudo tee /etc/apt/sources.list.d/oxen.listsudo apt update - Then install Lokinet-GUI panel. This installs several packages, in my case, on Pop!_Os 22.04 LTS it installed 15 packages.
sudo apt install lokinet-gui - Normally DNS is controlled by Network Manager and systemd-resolved services and those always mess up DNS. Here we’ll disable the automatic DNS management, so stuff stays intact in
/etc/resolv.conf
Disable and stop the systemd-resolved service:sudo systemctl disable systemd-resolvedsudo systemctl stop systemd-resolved
Then put the following line in the[main]section of your/etc/NetworkManager/NetworkManager.conf:dns=default
Delete the symbolic link/etc/resolv.confrm /etc/resolv.conf
Restart NetworkManagersudo systemctl restart NetworkManager
Then create your own/etc/resolv.confvi /etc/resolv.conf
add this line in the empty filenameserver 127.3.2.1
Save the file. Now your DNS resolver is Lokinet. So, if your name resolution at some point has problems, restarting Lokinet will probably fix the problem. Here’s the command if you need to do it:sudo systemctl restart lokinetIf restarting Lokinet doesn’t fix your DNS problem, you can always change the resolver defined in/etc/resolv.confto another server, such as Cloudflare’s 1.1.1.1 or Quad9’s 9.9.9.9 - You should now be able to get to Lokinet and clearnet (=the regular Internet) sites. Test that with ping:
ping directory.lokiand you should get responses like this back:PING directory.loki (172.16.0.3) 56(84) bytes of data.64 bytes from c1zkk4e4ug16xz8our1waeims8drhnc558erioqx35pzyg7w8ryo.loki (172.16.0.3): icmp_seq=1 ttl=64 time=553 ms64 bytes from c1zkk4e4ug16xz8our1waeims8drhnc558erioqx35pzyg7w8ryo.loki (172.16.0.3): icmp_seq=2 ttl=64 time=575 ms
and when you ping a clearnet site, such asPrivacyProShop.comyou should get responses like this:PING PrivacyProShop.com (64.52.84.90) 56(84) bytes of data.64 bytes from 64.52.84.90.static.skysilk.com (64.52.84.90): icmp_seq=1 ttl=53 time=33.3 ms64 bytes from 64.52.84.90.static.skysilk.com (64.52.84.90): icmp_seq=2 ttl=53 time=31.6 ms
Notice how much shorter the ping times are on clearnet vs Lokinet. With Lokinet your ping times are usually several hundred milliseconds vs. 30-60 ms over the clearnet. - Then try Lokinet GUI Panel
Start by clicking on the Lokinet GUI Icon The control panel will probably crash. If it does, you will need to edit a file, use a text editor (FYI: real men use vi)
sudo vi /usr/share/applications/lokinet-gui.desktop
find this line:Exec=/opt/Lokinet-GUI/lokinet-gui %U
and replace%Uwith--no-sandboxlike this:Exec=/opt/Lokinet-GUI/lokinet-gui --no-sandbox
Then log out of Gnome and log back in and Lokinet GUI should now start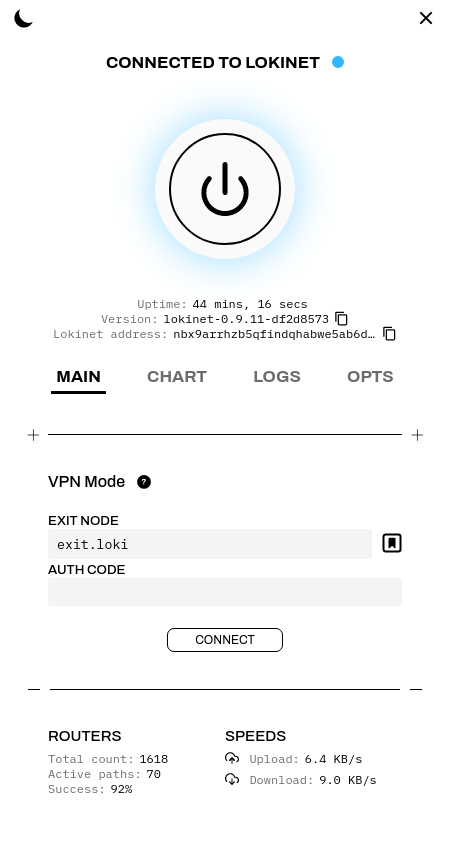
- Lokinet is running as a service, so it is running all the time, this GUI panel allows you to see your connection time, version and your Lokinet address. You can also start Lokinet VPN mode using an exit node address. Exit.loki is the default node, but there are other free ones, too. You can find those at https://oxen.directory/exitnodes or you can purchase access to fast commercial nodes at https://PrivacyProShop.com and support this site!
To start, press the “Connect” button below the exit.loki exit node. Exit.loki doesn’t require an Auth Code, so you can leave that blank. After a few seconds of connecting, the button should say “Connected in VPN Mode” . Also, you will notice that exit.loki will change to a long Lokinet address as the system connects.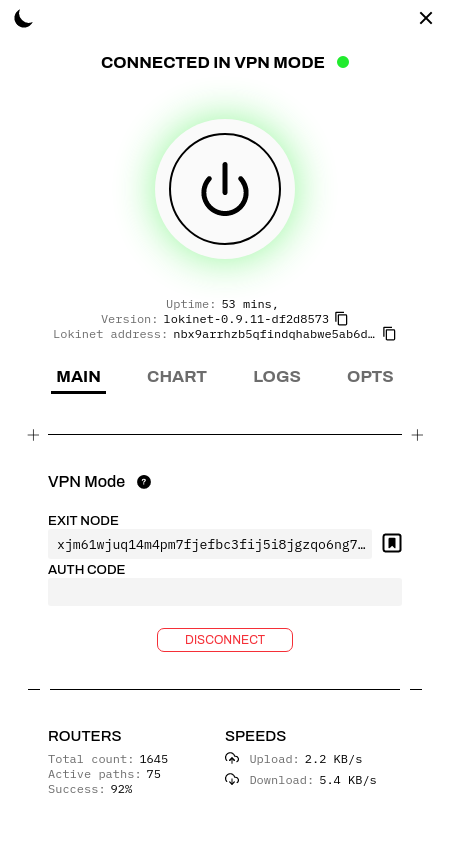
- When you open and close Lokinet exit nodes, Lokinet occasionally crashes. When Lokinet crashes, it will stop all access to the network. To get things back to normal, open a command prompt and restart Lokinet and everything will be good again:
sudo systemctl restart lokinet